I first found this recipe on Pinterest. Isn't that where everyone finds recipes now?! Anyway, I didn't have all the butter that it called for so I modified it a little. It came out fantastic. Definitely a keeper. We ate it for dessert after dinner and then again for a sweet breakfast. Here is the recipe I ended up with.
Cinnamon Roll Coffee Cake
Cake
3 C. flour
1/4 t. salt
4 t. baking powder
1 C. sugar
1 1/2 C. milk
2 eggs
2 t. vanilla
1/2 C. butter, melted
Topping
1/2 C. butter, softened
1 C. brown sugar
2 T. flour
1 T. cinnamon
Glaze
2 C. powdered sugar
5 T. milk
1 t. vanilla
Cake - Heat oven to 350 degrees. Whisk together the flour, salt, baking powder and sugar. Add milk, eggs, and vanilla and mix until incorporated. Stir in melted butter last. Pour into a 9x13 pan.
Topping - Mix all ingredients together and drop by the spoonful onto the cake and then swirl with a knife.
Bake for ~35 minute or until toothpick comes out clean.
Glaze - Mix all ingredients and pour over warm cake. Enjoy :-)

Monday, January 21, 2013

Sunday, January 20, 2013
Lego Organization {Instruction Manuals}
My son received a few sets of Lego Duplos for Christmas. Thankfully they all fit into one container. Unfortunately, the instruction manuals kept getting crushed on the bottom of the container. So, I started brainstorming Lego organization ideas. My first thought was to run to Staples and grab an adhesive binder pocket to stick on the side of the Lego Duplo container. I was thrilled with this solution...my two year old was not. So, I was stuck at home and needed to make do with the supplies I had on hand. In the end I think it turned out better than my original idea.
I ran to my craft closet and emerged with the following items.
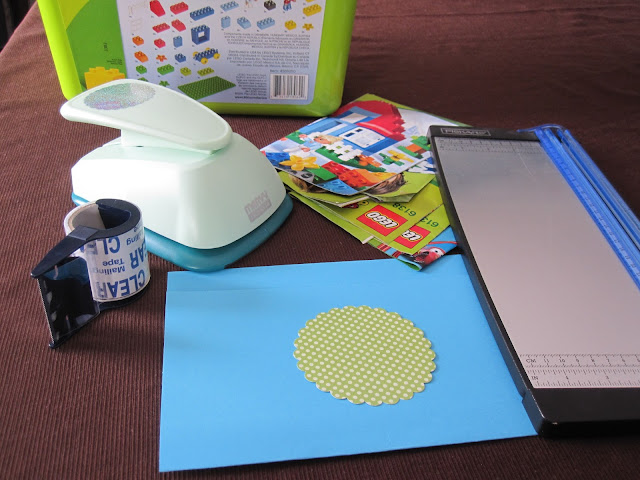
Mailing tape, scalloped paper punch, 12"x12" cardstock, paper cutter (ultimately not used), and Martha Stewart Labels (not shown).
I folded the cardstock, placed the label on the front and attached it to the back of the Lego container with the mailing tape.The tape secures the pocket to the container and effectively laminates the front of the pocket to protect it from the two year old who wouldn't let me go to the store in the first place.
Our Lego container went from this.

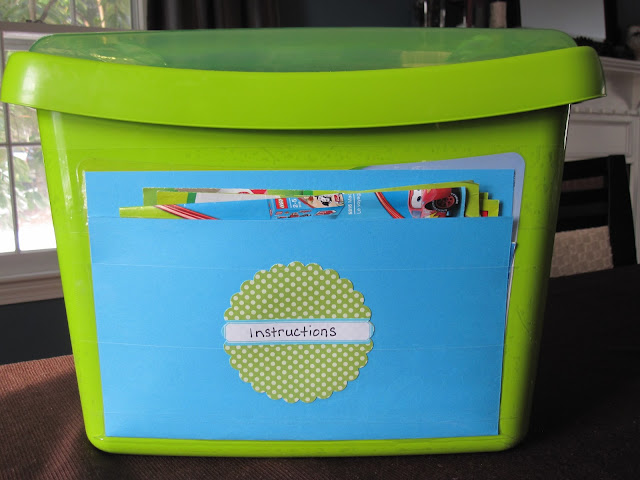
Ahhh. Much better.
I ran to my craft closet and emerged with the following items.

Mailing tape, scalloped paper punch, 12"x12" cardstock, paper cutter (ultimately not used), and Martha Stewart Labels (not shown).
I folded the cardstock, placed the label on the front and attached it to the back of the Lego container with the mailing tape.The tape secures the pocket to the container and effectively laminates the front of the pocket to protect it from the two year old who wouldn't let me go to the store in the first place.
Our Lego container went from this.

To this.

Ahhh. Much better.
Tuesday, January 15, 2013
An Organized Junk Drawer
I was at Homegoods the other day and saw this great drawer organizer. It was only $7.99, so I threw it in my cart.

When I got home I got to work. This is what the drawer looked like when I started.

I guess it wasn't horrendous, but it wasn't great either. I started by pulling everything out of the drawer, setting it on the table, and getting rid of anything that didn't belong in the drawer. Next, I lined the bottom of the drawer with some pretty drawer paper. Also from Homegoods. Finally, my assistant and I put all of the remaining items into the new organizer.

And popped it back into the newly lined drawer.

It has been a few months since I finished this small project and it is still organized. And I still smile every time I open the drawer!

When I got home I got to work. This is what the drawer looked like when I started.

I guess it wasn't horrendous, but it wasn't great either. I started by pulling everything out of the drawer, setting it on the table, and getting rid of anything that didn't belong in the drawer. Next, I lined the bottom of the drawer with some pretty drawer paper. Also from Homegoods. Finally, my assistant and I put all of the remaining items into the new organizer.

And popped it back into the newly lined drawer.

It has been a few months since I finished this small project and it is still organized. And I still smile every time I open the drawer!
Tuesday, January 3, 2012
New Years Resolution (NYR) - Days 1 through 3
So far so good. I'm three days into the new year and I have done three things to improve the functionality of this home.
Day 1 - Crayons
We have a craft drawer in our Family Room closet that holds all of my daughter's markers, pens, pencils, and crayons...and a few random glitter pens.


Day 2 - Wooden Dolls
My daughter has some magnetic wooden dolls that were originally in a tall flexible plastic pouch that was a pain in the you-know-what. It didn't fit in any of our toy cubbies/shelves so it usually got stuck between the couch and the end table. Becuase it was hidden away from the other toys the dolls didn't get played with very much. Out of sight out of mind. So, when we got another set of magnetic wooden dolls for Christmas this year I knew I had to come up with a better solution. Enter another empty container of baby wipes.

I guess it's a good thing I never throw these things away.
Day 3 - Labeling
Since I do not have a label maker or a Silhouette (oh the things I could do with this) I went to Hobby Lobby and got some 40% off stickers. For less than $2 I labeled the crayon container and the wooden doll container.


Day 1 - Crayons
We have a craft drawer in our Family Room closet that holds all of my daughter's markers, pens, pencils, and crayons...and a few random glitter pens.

So, I pulled out all of the crayons (broken and intact) and separated them into two containers. The intact crayons ended up in an old containers of Triple Paste diaper rash cream.

The broken crayons now live in an old baby wipes container. I have plans to melt them down into some new funky shaped crayons for the kids. Inspiration thanks to Pinterest.

Day 2 - Wooden Dolls
My daughter has some magnetic wooden dolls that were originally in a tall flexible plastic pouch that was a pain in the you-know-what. It didn't fit in any of our toy cubbies/shelves so it usually got stuck between the couch and the end table. Becuase it was hidden away from the other toys the dolls didn't get played with very much. Out of sight out of mind. So, when we got another set of magnetic wooden dolls for Christmas this year I knew I had to come up with a better solution. Enter another empty container of baby wipes.

I guess it's a good thing I never throw these things away.
Day 3 - Labeling
Since I do not have a label maker or a Silhouette (oh the things I could do with this) I went to Hobby Lobby and got some 40% off stickers. For less than $2 I labeled the crayon container and the wooden doll container.


And after my daughter added her creative touch.

So, 3 down 362 to go. Yikes. Let's hope I can keep it up...the momentum that is.Saturday, December 31, 2011
2012 New Years Resolution
Going from a full time engineer to a stay-at-home-mom is definitely an adjustment, but I am loving every minute of it. One thing that I have realized around here is that my house does not look or function like I want it to. It is very unorganized and cluttered and my decor tastes have changed a lot since we moved in and decorated 6 years ago. I can't believe I didn't notice how bad it was when I was working full time. Nonetheless, now that I am home with my kiddos all day I need to get this place in shape. So, my New Years Resolution is to do one thing every day to make my home work and look better for my family. I will do one thing to clean, declutter, organize, or beautify my home every day. It can be as simple as organizing a drawer or as compicated as remodeling a bathroom, but something will get done every day.
Here's to 2012!
Here's to 2012!
Subscribe to:
Posts (Atom)